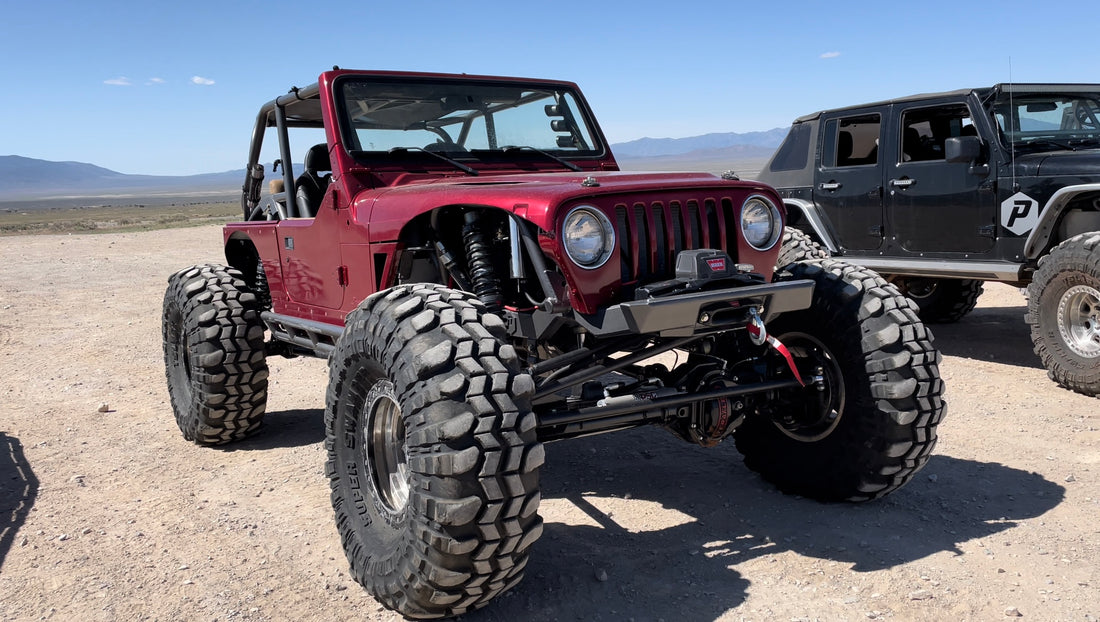
****** CAYLEB'S JEEP WRANGLER TJ WRITE UP & INFO******

If you have watched any of our earlier videos on our YouTube channel: Peck Brothers Off-Road it is no secret that there was an enormous amount of blood sweat and tears that went into this build. Here you will find more details about this Jeep than are present on our YouTube or any of our social media's for that matter!! {So if this is where you have been sent from messaging us on instagram about this build, YOU ARE IN THE RIGHT PLACE} Keep in mind if your ready to roast me for the mistakes and imperfections of the build, I was 19 years old when I started building this jeep so give me some slack lol. Thank you so much for your interest, enjoy 😁


These are the first 2 pictures I have of my (now red) jeep. We found this gem on Facebook marketplace back on August 25th 2020, on our way to Oklahoma. We drove clear from Southern Idaho to Claremore, Oklahoma FOR A GOOD DEAL ON JEEP PARTS. Looking back now, we did not get the better end of the deal 😂. If you would like to see the whole story about this journey you can watch it on our YouTube channel: Peck Brothers Episode 1 skip to 6:40 in the video to start there unless you want to watch Cayleb and Alex babble on about completely irrelevant information lol. If your gonna watch it, bare with us it was like our first video 🤦🏼♂️.
"Original Specs"
Before I get too into tearing it apart, I should explain what it was to begin. This is a 1998 Jeep Wrangler TJ in Emerald Green Metallic color, it came with the AX-5 (5 speed manual) transmission. Tan interior, Dana 30 front axle and a Dana 35 rear. It was in mint condition other than the piston that blew a hole in the side of the 4 cylinder powerhouse.


It look almost a full day to get it completely torn into pieces.


At this point I had almost fully disassembled the hardest parts to keep track of in the jeep, all the bolts as organized into ziplock bags as I could! it was now time to pull the body off the frame to remove the axles as fast and easily as I could!


With the axles completely removed and the body off, I was ready to start selling all the parts I didn't need. Sold the front and rear ends, the transmission, the gas tank, the transferase, the tires and wheels, ect. Then I tossed the body back on, through it up on jack stands, and mocked up the wheelbase/ride height and overall image I was looking for. This is what I got:

I had found a set of 43" Super Swamper TSL SX tires mounted on a set of 17" forged Trail Ready beadlocks. I had also found a 2006 Super Duty Sterling 10.5 rear axle.


{All original pictures}

I need to mention to all who didn't see or go watch the trip to Oklahoma, while I was there I got an Engine (Stock 2005 LQ4 6.0) Transmission (Stock 4L80E) and a Transercase (Brand New Advanced Adapters Altas 2 4.3:1) Along with an 05+ Superduty front axle and some other odds and ends.

(I'll show the transmission/transferase and front axle later)
-----------------

At this point it became very clear, we needed to design a custom front part of the chassis (front half) as well as a custom rear part of the chassis (back half). I had never done chassis work in my life, but I had no choice. I wanted the jeep to sit too low at ride height (normal driving around height) , with too much "up travel" (suspension travel coming upwards toward the frame). Basically if I kept the stock frame the axles would come up and hit the frame when the suspension is cycled.
So I just started putting my mind to it and this is what I came up with:

I loved the radius mandrel bend on the bottom in the original frame. So I cut after that bend with the original frame on its way up.

Then it was time for some Motobilt love 😁😁

This truss is by far my favorite Sterling 10.5 truss!! And it was from one of our favorite companies: MOTOBILT
Part # (SKU) : MB4069 Motobilt.com

Then I paired the Motobilt truss with their rear differential cover and their bump pads!!
(Diff cover) SKU : MB4032
(Bump Stop Pads) SKU : MB2141


Then the body went back on to test fit everything for the last time (The body had been on and off multiple times for test fitting everything).


Th back still needed a couple of things to be completely buttoned up like the hitch and d-ring mounts but it was just trying to get it all put together to finish weld and complete everything at the same time.
Then the daunting task of the front started!!


As you can see in the pictures, I made 2 brace pieces. One on the front and one on the rear. This insured I would keep the perfect frame width, so all of my body mounts would still line up.
Then the body back on...... again 😂


Here is that Super Duty 60 that I acquired from Oklahoma. I had the housing sandblasted so it looked pretty. I decided after weeks of research on using a 1978 Ford Bronco Steering box. There was so much un-charted territory here so if this is something your interested in doing, this will help a lot!! The 1978 Bronco box is a: forward facing/outside-frame mount steering gear. The sector shaft (what the pitman arm mounts to) is the same spline as: (Most) Ford Econoline Vans, All Jeep Wrangler TJ/LJ, and I'm almost positive the YJ pitman arms will work as well (don't hold me to it).

The input splines on the control valve housing ^^ (where your u-joint-like steering column shaft comes in) is the same Ford Econoline vans and I'm almost positive all the F-150/F250/F350 from 1977-1986. Mine is the Econoline Van one so I would just find one of them, they are literally all over the junk yards. They look like this:

Grab you a input steering gear shaft off of one of these.^^ And you can grab the pitman arm too, the splines will work but it will only work if you plan on making your own pitman arm. (That's coming later). If you don't plan on making your own the pitman arm off of the Econoline won't be optimal because it won't align right. The key in the splines doesn't align straight with the box. (The pitman arm isn't facing straight when the box is turned straight) and it can only go on 1 way.
------------


And little by little it turned into this:


Then with the whole thing mocked up I was able to get a good look at what it really was going to look like!!


This was a massive milestone. It started to really take shape for the first time. I had to get really serious about the suspension setup and geometry. For beauty/strength/simplicity and correct anti squat sake we went with the Motobilt 4 Link System.


I would highly recommend this system to anyone!
Motobilt.com (SKU) : MB1517
Once the Motobilt 4 link system was welded on it was time for fishplate and reinforcing the chassis.


I brought it over to one of my best friends, Nate Williams one of the owners of Impulse Off-road. We worked to design the perfect "fish plate" (plates to cover and strengthen the joints where the separate pieces come together) on his CAD program and but them out on his plas-table. The additional frame rail (The front and back half) is 2x4 3/16' thick mild steel, the fish plate we cutout is 3X16' mild steel as well.


If you can tell here ^^ the 2x4 tubing is about 1/4" skinnier than the original frame so I made my fishplate piece to go in threw the frame as far as it could until it reached the bend, then I took a 2-3/4" hole saw to the original frame and welded the fishplate (inside the frame) to the original frame in the hole.

Then disaster struck and my parents sold there house lol. Long story short the jeep had to be rolling in 1 month. So while having covid in the dead middle of winter in an un-insulated garage I got the jeep rolling and it almost killed me.

For the Links I used 2" .250 wall DOM with a weld in bung to accept the 1-1/4" Curried Jonny Joints with the 9/16 bolt hole.


So with just lower links on and mounted and a piece of DOM welded from the frame to the axles, I packed all the parts I had inside the jeep.


So we loaded'r up and it was off to my oldest brother Brady's house!! On one condition, I don't touch his tools and its done in 3 months..... lol 😂😂


We got right to work mounting the motor.
It quickly became clear that the jeep had too much up travel for the exhaust to head down like it normally does, so we turned the headers upside down, and ran it upwards!!


After the engine mounts were done, took on the rear upper links links.

The jeep was so low at "Full Bump" (As low as the vehicle can sit with no shocks, with the bump stops fully compressed) I had to bring the rear truss and links through the floor.


This here is precisely full bump in the rear. ^^
-------------------

We found the perfect truss for this build, made by https://barnes4wd.com
(Part number) B4WK12351
This truss is the lowest profile full length truss we could find, and it was engineered extremely well. Very strong design.

I took the truss to around 550 degrees Fahrenheit then welded in about 5-6" sections then re-heated, I used a propane weed burner and it worked perfect! Then I let it cool around 100 degrees at a time then I would reheat the whole housing then let it all cool again with a welding jacket wrapped around it each time it would cool. Sidenote: the goal here is to cool the whole housing consistently, the mild steel truss will want to cool relatively faster than the differential. The steel will contract before the iron housing will and it will create a pressure point and is prone to cracking on the weld. Also helps to hit the housing with a hammer to relive stress during the cooling imitating a "peening tool" which is what should be used to get the best results.

--------------------

Here was a massive change to the chassis the happened during the build. I rebuild the frame post steering box so the drag-link (link between steering box to axle) could move through it. This angle really makes sense of the outside mount steering box, notice how low the sector shaft is (bottom of steering box) being outside the chassis makes it so it doesn't have to be above the differential. It can sit almost 4 inches lower than where the stock location is. Also it makes for a longer drag-link (better steering geometry)


---------------------------
Then came the track bar bracket.

All of our components up here are made from 1-1/2" .250 wall DOM with the welded in bung to accept the 7/8' Heim joints with the 5/8" bolt hole high misalignment spacers.


---------------------------
Here is that pitman arm I was talking about.

This was one of the toughest things to figure out on the whole jeep, mostly because it has 50 degrees of steering. So this pitman arm is hand made from 1/4" mild steel and has 2 compound bends. It is shaped like a boomerang so it can wrap around my axle housing and not touch my differential fully turned passenger at full bump. I used the center splines off of a Jeep TJ pitman arm I had and sleeved it in a piece of DOM I found that was the perfect circumference for the splined piece (now almost round to fit in). I left some of the protruding pitman arm on it so it would sit as a key and make the overall strength of the pitman arm greater.


Also at this point I made the frame side track bar mount. Wanted to use a poly bushing so the track bar had a little movement and wasn't to solid.


Here is the whole system at full bump.


We are running the https://www.jessehainesfab.com high steer arms, with some added Peck Brothers drag link double sheer reinforcement.


3 Link Front:

We are running a 3 link front and this is how we did it being this low using a full size Johnny Joint upper. ^^ I cut the existing Motobilt upper link off and built a link mount to accommodate the driveline which at full bump sits about 1/2" way from that bracket in the center of that indent.

You may be wondering where on earth the air bumps are on the front. Well.... this is the only place I could get them. I used the top of the custom upper link mount as a bump pad and ran them on the inside of the frame attached to the track bar mount.


She's a little on the tight side......

Rig at full bump at this point:


------------------
Exhaust time.


Its running 2.5" exhaust on the Y-Pipe then once they tie in it goes up to 3 all the way to the back of the jeep. Using a Black Widow, Widow Maker 10" muffler and if you are contemplating this just keep in mind its about 400 octaves too loud for anyone lol.
------------------------------------
Brakes.

Here is the Hydro Boost brake booster its running. It is a 2005 F350 power stroke hydro boost from the local wrecking yard. Cost me 20$ and its probably the greatest $20 you could invest in any jeep. The brakes on this jeep are insane. SO much control in technical places.

Here is the bracket I made to clock the hydro boost down to miss my hood with the brake fluid reservoir.

----------------------------------
Getting Serious About Tube Work.

Here's the shock hoops they only took all weekend because there is multiple compound angles to sneak past the brake booster.

Running 14x2.5 Radflo Coilovers

THEN THE CAGE.

I knew for sure it needed to be a fast-back style cage.

The whole main whoop is all 1 piece and it took at least as long as your thinking it did to figure it out.

Then came the new school additions. ^^


Then mounting the coilovers to the cage.


That tube was the hardest piece by far on the entire jeep to make. (piece that holds the coilover).


The rock sliders in the making, checking to make sure my idea would look they way I wanted it to.

And it did.


Here is a look at the shock hoop spreader. And the exhaust. (didn't end up using this intake due to heat on the plastic)


Right here is when all of my brake parts came! I used the Powerstop Brake calipers/rotors and pads. They have been awesome so far but I know these full kits may be getting tough to find!
------------------------------
Winch and Bumper.

This was another tough thing. I wanted my winch to sit down inside the frame for cooling/airflow purposes and for strength as well. But I didn't want my fairlead getting smashed against rocks all the time, so I recessed it in the bumper.


Using a Warn EVO VR10S winch.
------------------------------
One more final disassembly and finish weld.

Mounting odds and ends, grill mount, sway bar, rear body mounts, battery tray, shock hoop reinforcements ect.


Terrible Mistake of using Rustolem Universal Flat Soft Iron spray paint because I figured I could touch it up easily when it get scratched...... they quit making it. So ill be pulling the whole thing back apart as some point and have the whole frame sand blasted and powder coated. Learn from me. Just powder coat it.

----------------------------
One last Pre-Paint final assembly to make sure everything is perfect.


Things like
- (Fuel Lines) Hotrodfuelhose.com
- (York on-board Air Compressor) & mount Goatbuilt.com
- (Power Steering Pump/Reservoir/Coolers) Pscmotorsports.com
- (Axles & Links Painted) POR 15
- (Gas Tank) Motobilt.com
- (Fuel Pump) Walbro 255 with stock TJ sending unit
- (Accessories Brackets) Goatbuilt.com
- (Gauges) Glowshiftdirect.com


Now is a good time to talk about the motor^^
- 2005 Gen 3 LQ4 6.0 (LSX Iron Block)
- LQ9 Flat Top Pistons (compression increase to 10.3:1)
- Briantooleyracing.com (Truck Torque Cam) SPECS: 202/202 .511/.511 111+1
- 706 Heads (compression increase again to 11.6:1)
- LS9 (Valve Springs)
- Fabricated LS6/LS2 (Intake Manifold)
- Fuelinjectorconnection.com (Injectors)
- Mastmotorsports.com (Oil Pan)
- Speed-engineering.com (Headers)
Here's that bone stock 4L80E with a bone stock toque converter (That's gonna change when I'm not broke)

-------------------------------
Then she went in for paint.


This color is a 2021 Honda Accord color called: Radiant Red Metallic. Color Code: R569M

And if you are someone that is familiar with our channel this was the very first video this jeep was in!!

Dash Back In ^^

Will It Start? Thumbnail^^

Front Fenders Video Thumbnail ^^


Motobilt.com blank rear corners ^^^

The axles are running all Yukon parts. They are 5:13 gears and ZIP AIR Lockers. Running stock 35 spline sterling axle shafts in the rear with Eastcoastgearsupply.com 1550 spicer F450 shafts in the front. Also running Warn Hubs on the front.

-------------------------
The last parts of the jeep are covered for the most part in our YouTube channel and to be honest the rest of that happened was just tedious hard aggravating things to get it to where it is today.


THANK YOU to anyone who has read this far. I hope that learning of this jeep either helps you with your build weather its parts to use/ ideas to trigger new creative way to make things better. Or I hope this inspires you to know that you can build your own. And if you aren't a jeep or car guy at all I hope it was at least entertaining and interesting to read. I'm sure I will add to this over time as people request more depth on curtain aspects. Thank you so much again!!!
-Cayleb Peck (Youngest Peck Brother)


